Easy Pumpkin Cheesecake Bars – Cozy Fall Treat
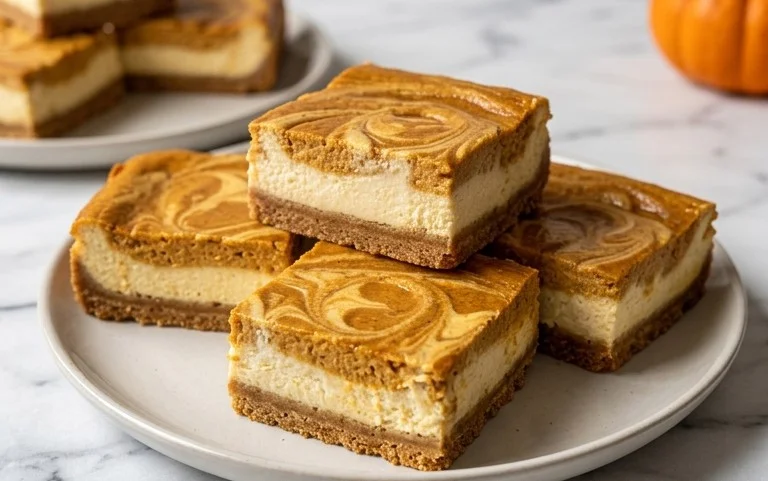
Pumpkin cheesecake bars are the ultimate autumnal indulgence, a delightful twist on a classic dessert that brings all the cozy flavors of fall right to your fingertips. Imagine a rich, creamy cheesecake filling, infused with warm pumpkin spice and swirled into a buttery graham cracker crust. It’s a combination that’s simply irresistible, isn’t it? This isn’t just any pumpkin dessert; these pumpkin cheesecake bars offer a perfect balance of textures and tastes, making them a crowd-pleaser at any gathering, from casual get-togethers to holiday celebrations. What makes them so special? It’s the effortless elegance and the pure comfort they deliver. Unlike a full cheesecake, they’re easy to serve and enjoy, cutting cleanly into perfect portions that are almost too pretty to eat. Get ready to fall in love with these delectable pumpkin cheesecake bars all over again.
Pumpkin Cheesecake Bars
There’s something undeniably comforting about the transition from crisp autumn air to cozy evenings, and for me, that comfort is inextricably linked to the flavors of pumpkin and spice. While a full-sized pumpkin cheesecake is a showstopper, sometimes you crave that same decadent experience in a more portable, shareable, and dare I say, easier-to-manage format. Enter these glorious Pumpkin Cheesecake Bars. They deliver all the creamy, tangy, spiced goodness of a classic cheesecake but in a convenient bar form that’s perfect for potlucks, holiday gatherings, or simply indulging your sweet tooth without the fuss of slicing a whole pie.
These bars are surprisingly simple to make, requiring no water bath and minimal chilling time before they’re ready to be devoured. The base is a buttery, crumbly graham cracker crust that provides the perfect foundation for the rich, spiced pumpkin cheesecake filling. Each bite is a harmonious blend of sweet cream cheese, earthy pumpkin, and a warming embrace of cinnamon and pumpkin pie spice. Get ready to impress yourself and everyone around you with these delightful treats!
Ingredients:
- 15 whole rectangular graham crackers
- 1/4 cup granulated sugar
- 8 tablespoons unsalted butter (melted)
- 1-1/4 cups pumpkin puree
- 1-1/2 teaspoons pumpkin pie spice
- 1-1/2 teaspoons ground cinnamon
- 1 tablespoon all purpose flour
- Three 8-oz packages full fat cream cheese (at room temperature)
- 1-2/3 cup granulated sugar
- 1-1/2 teaspoons pure vanilla extract
- 1/2 cup full fat sour cream
- 1/8 teaspoon salt
- 3 large eggs (at room temperature)
Crust Preparation
The foundation of any great bar is its crust, and this graham cracker crust is no exception. It’s simple, satisfying, and provides the perfect textural contrast to the smooth cheesecake filling.
1. **Prepare the Graham Crackers:** Begin by crushing the graham crackers. You can do this by placing them in a resealable plastic bag and using a rolling pin to break them down into fine crumbs, or by pulsing them in a food processor until they resemble coarse sand. Aim for consistency, as this will help the crust hold together beautifully. Once crushed, pour the crumbs into a medium-sized bowl.
2. **Mix the Crust Ingredients:** To the graham cracker crumbs, add the 1/4 cup of granulated sugar. This sugar will not only sweeten the crust slightly but also help it bind together. Next, pour in the 8 tablespoons of melted unsalted butter. Stir everything together thoroughly with a fork or a spatula until all the crumbs are evenly moistened and clump together when squeezed. It should have the texture of wet sand.
3. **Form the Crust:** Line a 9×13 inch baking pan with parchment paper, leaving an overhang on two opposite sides. This overhang will be incredibly helpful when lifting the finished bars out of the pan. Pour the graham cracker mixture into the prepared pan. Using the bottom of a measuring cup or your hands, firmly press the crumbs evenly across the bottom of the pan. Make sure to create a compact, even layer. You want a sturdy base that won’t crumble easily when you cut the bars later. Bake the crust in a preheated oven at 350°F (175°C) for 8-10 minutes, or until it’s lightly golden brown and fragrant. This pre-baking step helps to set the crust and prevent it from becoming soggy. Once baked, remove it from the oven and let it cool slightly while you prepare the filling.
Pumpkin Cheesecake Filling
Now for the star of the show – the creamy, spiced pumpkin cheesecake filling! Achieving a smooth, luscious texture is key here, and using room temperature ingredients makes all the difference.
4. **Combine Cream Cheese and Sugar:** In a large mixing bowl, add the three 8-oz packages of full-fat cream cheese, which should be softened to room temperature. This is crucial for a lump-free batter. Beat the cream cheese with an electric mixer on medium speed until it’s completely smooth and creamy. Gradually add the 1-2/3 cups of granulated sugar and continue beating until well combined and no sugar granules remain. Scrape down the sides and bottom of the bowl periodically to ensure everything is incorporated.
5. **Add Pumpkin and Spices:** In a separate small bowl, whisk together the 1-1/4 cups of pumpkin puree, 1-1/2 teaspoons of pumpkin pie spice, 1-1/2 teaspoons of ground cinnamon, and 1 tablespoon of all-purpose flour. The flour here acts as a binder, helping to prevent the filling from cracking. Add this pumpkin mixture to the cream cheese mixture and beat on low speed until just combined. Be careful not to overmix at this stage.
6. **Incorporate Wet Ingredients and Eggs:** Next, add the 1-1/2 teaspoons of pure vanilla extract, 1/2 cup of full-fat sour cream, and 1/8 teaspoon of salt to the bowl. Mix on low speed until everything is just incorporated. The sour cream adds a lovely tang and extra creaminess to the filling. Finally, add the 3 large eggs, one at a time, beating on low speed after each addition until the yolk is just broken and incorporated. Again, avoid overmixing once the eggs are added, as this can incorporate too much air and lead to cracking. The batter should be smooth, creamy, and a beautiful pale orange hue.
Baking and Chilling
The final steps involve baking the bars to perfection and then allowing them to cool and set, which is vital for that characteristic cheesecake texture.
7. **Bake and Cool:** Pour the pumpkin cheesecake filling evenly over the pre-baked graham cracker crust. Spread it smooth with a spatula. Place the baking pan on a baking sheet to catch any potential drips. Bake in the preheated 350°F (175°C) oven for 35-45 minutes. The edges of the cheesecake should be set, but the center may still jiggle slightly when gently shaken. This is perfectly normal. Overbaking can lead to a dry cheesecake. Once baked, turn off the oven and crack the oven door open slightly. Leave the cheesecake bars inside the oven for about an hour to cool down gradually. This slow cooling process helps to prevent cracking. After an hour in the oven, remove the pan from the oven and let the bars cool completely on a wire rack at room temperature. Once fully cooled, cover the pan tightly with plastic wrap and refrigerate for at least 4 hours, or preferably overnight, to allow the cheesecake to fully set and the flavors to meld.
8. **Cut and Serve:** Once thoroughly chilled, use the parchment paper overhang to carefully lift the entire cheesecake slab out of the pan. Place it on a cutting board and use a sharp knife to cut it into bars. For clean cuts, wipe the knife with a damp cloth between each cut. Serve these delicious Pumpkin Cheesecake Bars chilled. They are fantastic on their own, or you can elevate them with a dollop of whipped cream or a sprinkle of chopped toasted pecans. Enjoy every delightful, spiced bite!
Conclusion:
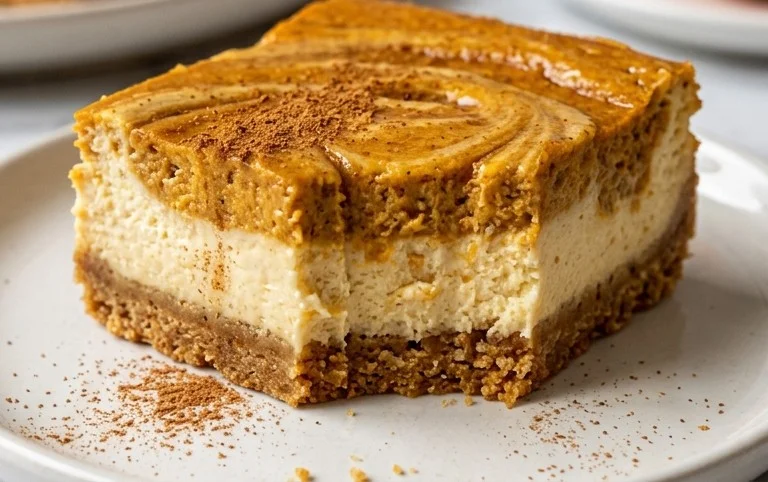
I hope you’re as excited to try these Pumpkin Cheesecake Bars as I am to share them with you! These bars are truly a showstopper, offering the perfect marriage of creamy, tangy cheesecake and warm, spiced pumpkin. The buttery graham cracker crust provides a delightful contrast to the smooth filling, making each bite an absolute indulgence. They’re incredibly versatile, making them ideal for any fall gathering, holiday dessert spread, or even just a cozy treat for yourself.
For serving, I love topping these bars with a dollop of whipped cream and a sprinkle of cinnamon, or even a drizzle of caramel sauce for an extra layer of flavor. If you’re feeling adventurous, consider adding a handful of chopped pecans or walnuts to the crust for added crunch and nuttiness. You could also swirl some caramel or chocolate into the pumpkin cheesecake layer before baking for a fun surprise!
Don’t hesitate to experiment with your favorite fall spices – a pinch of nutmeg or cloves can be a wonderful addition. I truly encourage you to give these Pumpkin Cheesecake Bars a go; I’m confident they’ll become a new favorite in your dessert repertoire. They’re a guaranteed crowd-pleaser that’s surprisingly easy to make!
Frequently Asked Questions:
Can I make these bars ahead of time?
Absolutely! These Pumpkin Cheesecake Bars are best made a day in advance. This allows the cheesecake filling to set completely and the flavors to meld beautifully, resulting in an even more delicious dessert. Simply cover them tightly with plastic wrap and refrigerate until ready to serve.
How long do these bars keep?
Stored properly in an airtight container in the refrigerator, these bars will stay fresh and delicious for up to 3-4 days. The crust may soften slightly over time, but they remain incredibly tasty.
What can I substitute for graham crackers in the crust?
If you don’t have graham crackers, no worries! You can easily substitute other cookies for the crust. Vanilla wafers, shortbread cookies, or even gingersnap cookies would all create a wonderfully complementary crust for these Pumpkin Cheesecake Bars.
Pumpkin Cheesecake Bars
Decadent and creamy pumpkin cheesecake bars with a graham cracker crust. Perfect for fall gatherings or any dessert craving.
Ingredients
-
15 whole rectangular graham crackers
-
1/4 cup granulated sugar
-
8 tablespoons unsalted butter, melted
-
1-1/4 cups pumpkin puree
-
1-1/2 teaspoons pumpkin pie spice
-
1-1/2 teaspoons ground cinnamon
-
1 tablespoon all purpose flour
-
Three 8-oz packages full fat cream cheese, at room temperature
-
1-2/3 cup granulated sugar
-
1-1/2 teaspoons pure vanilla extract
-
1/2 cup full fat sour cream
-
1/8 teaspoon salt
-
3 large eggs, at room temperature
Instructions
-
Step 1
Preheat oven to 350°F (175°C). Line a 9×13 inch baking pan with parchment paper, leaving an overhang on the sides. -
Step 2
For the crust: In a food processor, pulse graham crackers until fine crumbs form. Mix with 1/4 cup granulated sugar and melted butter. Press mixture evenly into the bottom of the prepared baking pan. -
Step 3
Bake the crust for 8-10 minutes until lightly golden. Let cool slightly while preparing the filling. -
Step 4
For the filling: In a large bowl, beat cream cheese until smooth. Gradually add 1-2/3 cup granulated sugar and beat until well combined. -
Step 5
Beat in pumpkin puree, pumpkin pie spice, cinnamon, flour, vanilla extract, sour cream, and salt until just combined. Do not overmix. -
Step 6
Add eggs one at a time, beating on low speed after each addition until just incorporated. Scrape down the sides of the bowl as needed. -
Step 7
Pour the pumpkin cheesecake filling over the prepared crust. Spread evenly. -
Step 8
Bake for 40-50 minutes, or until the edges are set and the center is slightly jiggly. The bars should not be browned. -
Step 9
Let the bars cool completely in the pan on a wire rack. Then, refrigerate for at least 4 hours, or preferably overnight, before cutting into bars.
Important Information
Nutrition Facts (Per Serving)
It is important to consider this information as approximate and not to use it as definitive health advice.
Allergy Information
Please check ingredients for potential allergens and consult a health professional if in doubt.